Showing posts with label Server 2008 R2. Show all posts

Friday, 19 April 2013

Installation and configuration of XenApp Fundamentals 6

Citrix XenApp Fundamentals is a remote access solution that enables small to medium-sized business users to securely access their corporate windows applications and files from anywhere, either on LAN or at home, with an internet connection. The applications are securely stored on a central server and delivered to users, ensuring the utmost security of sensitive business data and reducing management costs. The seamless user experience and fast access make this product a complete app virtualization solution for business. For more info visit http://www.citrix.com/products/xenapp/features/editions/fundamentals.html


This guide is divided into two parts:
  • Step-by-step installation of XenApp Fundamentals 6 on Server 2008R2.
  • Basic configuration of Citrix XenApp Fundamentals.
System Requirements

1. XenApp 6 Fundamentals Edition must be installed on Windows Server 2008 R2 SP1. (Update your server with latest patches).

2. Enable Microsoft .NET 3.5 SP1 on Server 2008 R2.

3. Install Remote Desktop Services (Remote Desktop Session Host and Remote Desktop Licensing components) on Server 2008R2.

[ Note: Do not install XenApp Fundamentals on a Domain Controller ]

Step-by-step installation of XenApp Fundamentals 6 on Server 2008R2

Note: If you are using Active Directory, add the computer running XenApp Fundamentals to the directory before installation. XenApp Fundamentals can be part of a Windows workgroup or domain. [In this example the computer running XenApp Fundamentals is a part of domain]

1. Log on to the server as a domain administrator.

2. Insert the installation media and click 'Install or run program from your media'


3. On the welcome screen click 'Install'


4. Accept the license agreement and click Next.


5. On the Installation type page select "Application Server" and click Next.


6. Now if you want to view and interact with xenapp users do not select 'Disable shadowing' and click Next.


7. Provide the domain administrator username and password for the SQL database installation and latter management.


8. Now wait for the Citrix components to be installed.


9. The setup will prompt you to restart the computer to continue with the installation. Click 'Yes'


10. After the restart you will get 'XenApp Server Role Manager' console which says XenApp and Web Interface got successfully installed on your server. There we finish the installation of XenApp Fundamentals 6 on Server 2008R2.


Basic Configuration of XenApp Fundamentals 6

1. Go to Start > All Programs > Citrix > Management Consoles > Citrix Delivery Services Console.

Click 'Disable authenticode signature checking'


2. On the 'Select product and component' page select 'XenApp' and click Next.


3. Select the server by clicking 'Add Local Computer' and click Next.


4. Now check the summary and click Next.


5. Once the discovery has completed  click 'Finish'.


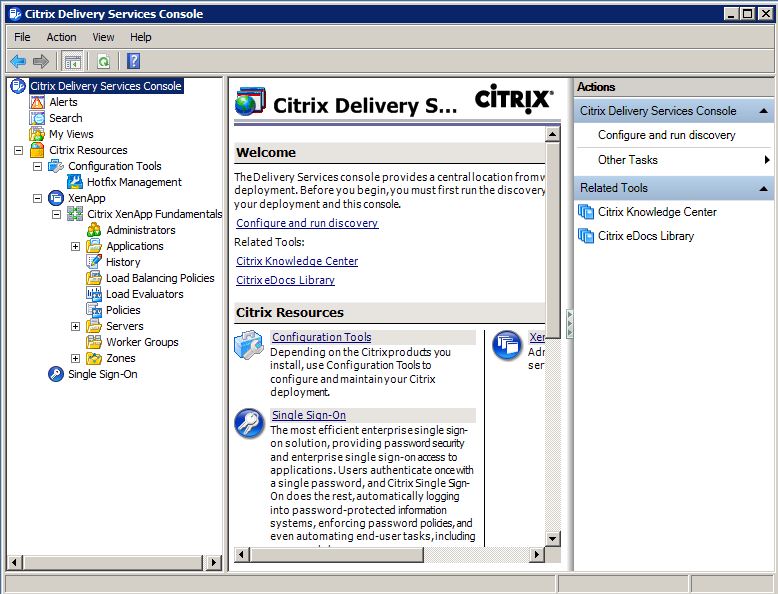
6. As soon as you click finish you will get a Citrix Delivery Service Console as below. This is the management console for Hotfix, XenApp Fundamentals etc.

Configuring Quick Start Options

7. Now go to Start > All Programs > Citrix > Quick Start. You will get a welcome page and click Next.


8. On the server configuration wizard select 'New Single Server' and click Next.


9. Now click 'Finish'.


10. As soon as you click finish you will get a console like below. Here we need to configure the Citrix license. Follow the below link to configure Citrix licensing : http://support.citrix.com/article/CTX126387
Here you can also activate the Remote Desktop License Server by clicking the Remote Desktop License Server option at the bottom of the console.


From the same page we can add XenApp Administrators and also configure Email alerting by clicking Administrators option on Setup pane.

To know how to publish an application and server desktop in XenApp server read How to Publish Application and Server Desktop in Citrix XenApp 6

Friday, 12 October 2012

NTP Time Server Configuration in Windows Server 2008R2 and 2012R2

Introduction

Time synchronization is one one of the most important aspect in a modern computer network. Network Time Protocol (UDP 123) is the protocol designed to synchronize the clocks of your computers over the network. This tutorial will guide you to configure an NTP Time server in your network. This server will act like an authoritative time server in your domain which will serve the client computers. The NTP Time server in your network will get time from an external time source like time.windows.com or time.nist.gov or from the system BIOS. In our scenario I am going to configure an NTP Server in a PDC Emulator that will obtain time from an external source.But Windows recommend us to configure an NTP server to obtain the time from a hardware source for improved security and accuracy. So optionally I will mention how to get the time from an internal source too.


Here I am listing out few importance of Time synchronization in a network:

1. Effective DC & DFS Replication.

2. Tracking security breaches, network usage, or problems affecting a large number of components can be nearly impossible if timestamps in logs are inaccurate. Time is often the critical factor that allows an event on one network node to be mapped to a corresponding event on another.

3. To reduce confusion in shared filesystems, it is important for the modification times to be consistent, regardless of what machine the filesystems are on.
This document will help you to configure a NTP Time server in Windows Server 2008.

Enabling & Configuring NTP Server

1. Change the server type to NTP.
Click Start, click Run, type regedit, and then click OK.
Locate and then click the following registry subkey: HKEY_LOCAL_MACHINE\SYSTEM\CurrentControlSet\Services\W32Time\Parameters\Type
In the pane on the right, right-click Type, and then click Modify. In Edit Value, type NTP in the Value data box, and then click OK.

2. Set AnnounceFlags to 5. 
Locate and then click the following registry subkey: HKEY_LOCAL_MACHINE\SYSTEM\CurrentControlSet\Services\W32Time\Config\AnnounceFlags
 In the pane on the right, right-click AnnounceFlags, and then click Modify. In Edit DWORD Value, type 5 in the Value data box, and then click OK.


3. Enable NTPServer.
Locate and then click the following registry subkey: HKEY_LOCAL_MACHINE\SYSTEM\CurrentControlSet\Services\W32Time\TimeProviders\NtpServer
 In the pane on the right, right-click Enabled, and then click Modify .In Edit DWORD Value, type 1 in the Value data box, and then click OK.


4. Specify the time sources.
Open a command prompt and type the command as below: w32tm /config /manualpeerlist:peers /syncfromflags:manual /reliable:yes /update
peers: time.windows.com or time.nist.gov

eg: w32tm /config /manualpeerlist:time.windows.com /syncfromflags:manual /reliable:yes /update

5. At the command prompt, type the following command to restart the Windows Time service, and then press Enter:
    
net stop w32time 
net start w32time 

Some Useful commands

Make sure that you run these commands from an elevated command prompt

1. To resynchronize time : w32tm /resync  or w32tm /resync /rediscover
2. To verify the configuartion : w32tm /query /configuration and w32tm /query /status
3. Display the current time zone settings : w32tm /tz
4. To reset the registry settings of NTP server: 
     net stop w32time
     w32tm /unregister
     w32tm /register
     net start w32time
5. To synchronize time on a linux client : ntpdate server_IP


Allow UPD Port 123 through Firewall

Make an exception in your firewall to allow UDP port number 123.

Apply the NTP client settings via Group Policy(Optional)

Now we have to tell the client computers to obtain the time from the NTP Server. The policy is applied via GPO. The procedure is as follows:

1. Locate the Group Policy Object : Computer configuration/ Policies/Administrative Templates/ System /Windows Time Services/ Time providers

2.  Enable the below settings:
    Configure Windows NTP Client (In our case, it is the IP of the PDC)
    Enable Windows NTP Client


    Obtaining time from a Local Source (Optional)

    This configuration forces the PDC master to announce itself as a reliable time source and uses the built-in complementary metal oxide semiconductor (CMOS) clock. To configure the PDC master by using an internal hardware clock, follow these steps:

    1. Click Start, click Run, type regedit, and then click OK.
    Locate and then click the following registry subkey: HKEY_LOCAL_MACHINE\SYSTEM\CurrentControlSet\Services\W32Time\Config\AnnounceFlags
    In the right-pane, right-click AnnounceFlags, and then click Modify.
    In Edit DWORD Value, type A in the Value data box, and then click OK.
     Close Registry Editor.
     At the command prompt, type the following command to restart the Windows Time service:
        net stop w32time && net start w32time

    By accomplishing the above tasks you can configure an NTP server in your domain.

    For more information about NTP you can visit : http://www.ntp.org/

    Wednesday, 10 October 2012

    Installation and Configuration of WDS on Server 2008 R2

    Introduction

    Windows Deployment Services is a technology used to deploy Windows operating systems through a network. It is one the most convenient way to install an operating system in a corporate environment. The RIS (Remote Installation Service) is the forerunner of Windows deployment service (WDS ). WDS can be used to deploy Windows XP, Windows Vista, Windows 7 and Windows server 2008 operating system. There are two installation methods in WDS
    1. Attended installation - Installation that is performed by user interaction during its progress.
    2. Unattended installation - Installation that is performed without user interaction during its progress or with no user present at all.
    In this tutorial we are going to see:
     
    1. Step-by-step configuration of Windows Deployment Service in Server 2008 R2

    2. Creating an Unattended XML file using AIK

    3.Creating a Customized Image of Windows 7

    Task 1 : Step-by-step configuration of Windows Deployment Service in Server 2008R2

    Open the server manager in Server2008 R2 and click Roles > Add Roles.

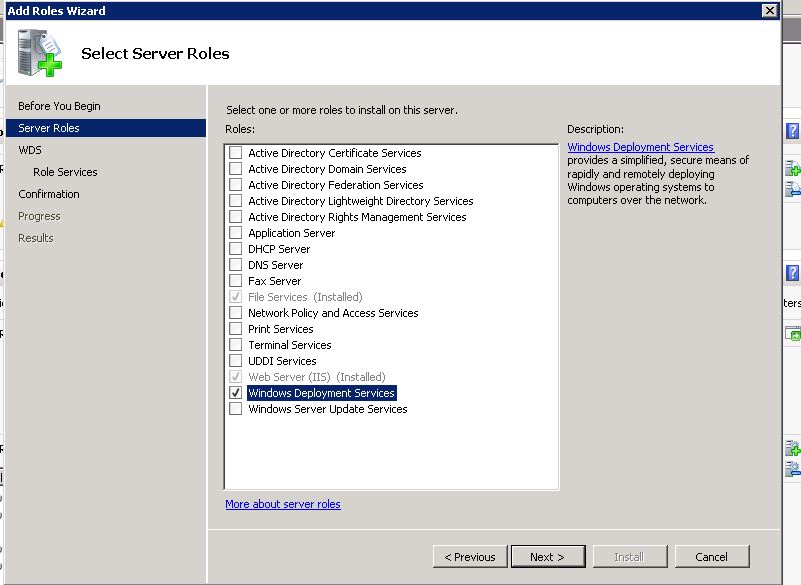
    1. Select the Windows Deployment Service check box and click next.
     

    2. You will get a WDS overview screen, read it out and click next.


    3. You will be prompted to select the role services. As of now select both deployment server and Transport server. I will explain the functionality of the transport server latter. Click next.


    4. You will get a confirmation screen, click Install.


    5. The WDS installation will finish within a few minutes.


    6. You will get a confirmation page after the successful installation. Click close.


    Now you can see the WDS management console in All programs > Administrative tools. Open up WDS management console.
    7. When you open the console you will be notified that the WDS Server is not yet configured. Now we have to configure the server by going to the Action tab>Configure server.


    8. You will get a welcome page, verify the prerequisites and click next.


    9. Choose a folder to store all the configuration details of WDS. It will be much better if you can choose a drive other than the system volume.


    10. WDS server configuration is completed. Click finish.


    11.Now you can upload install image and boot images for remote deployment.


    In our scenario I am going to add an image of windows 7. For this we need an installation disc of Windows 7. Insert the disc in your PC, explore it and search for the Source folder. Inside the Source folder you will see 'boot.wim' and 'install.wim' file. Copy these two files and paste it in a local drive of your WDS server.

    12. Right click the 'Boot Images' tab and click 'Add Boot Image' > Browse for the 'boot.wim' file which is stored in your local drive and click next.


    13.You can give the name and description of the image you are uploading.


    14. The boot image will be displayed as below after the upload.


    15. Add Install image by right clicking 'Install Images' and 'Add Install Image'. Browse for the 'install.wim' file and upload it to the server. After you upload an image you can see the image library as like below:

     
    16. The WDS server configuration is almost completed with the above step. Now we can fine tune the WDS services by right clicking the Server and going to the 'Properties' tab. Below you can see so many options in the server properties. But I am going to explain only about the unattended installation as it is one of the important feature of WDS


    Unattended Installation

    Unattended installation will help you to install the OS without any human intervention. The installation setup will run automatically by reffering the answer file that you have created.
    1. Switch on to the client tab and tick the check box “Enable unattended installation” and browse for the unattended xml file. The unattended answer file should be saved in your server's 'LocalDrive:\RemoteInstall\WdsClientUnattend' folder, which is created automatically once you install the WDS on your server 2008. I will explain how to create an unattended xml file later in this tutorial.

    2. Then go the image properties by right clicking the install image and tick the check box as shown below. Here you need to select a unattended.xml file which is stored on your local drive on your server.


    Task 2 : Creating an Unattended XML file

    To create an unattended xml file you can use the Windows AIK Tool kit or you can write your own xml file. Here I am using the Windows AIK Toolkit to accomplish the task.


    Download the Windows Automated Installation Kit from Microsoft website (http://www.microsoft.com/en-us/download/details.aspx?id=5753) and install it on your computer. You can download the software for free of cost from the Microsoft website.

    After the installation you can see the 'Windows System Image Manager' in All programs > Microsoft windows AIK > Windows System Image Manager.

    Open it and click 'Create an answer file' You will be prompted to select a Windows 7 image ('install.wim' file) and follow the instructions. Refer the screen shot below.


    After the image upload you will get a screen as below, where you can edit all the settings that you wanted to add to your answer file.


    In our scenario I am adding some settings like disk partition, automatically join the domain, IE home page etc in the answer file. Refer the following screen shots where you can find some of those settings.


    Once you finish adding all required settings in your answer file go to 'File > Save Answer file as' and save it with the name 'Autounattended.xml' and upload it to your WDS server. Below you can find the screenshot of an answer file that I have created. Also you can the check the following links for sample answer files: http://www.mockbox.net/windows-7-tips/149-windows-7-autounattend-example
    http://www.networknet.nl/apps/wp/archives/1402 

    Now you can boot the computer from the network and test the Windows Deployment Services. While you boot a computer from the network make sure that the PXE boot & LAN boot is enabled in the BIOS. If you enable unattended installation then the OS installation will start automatically with the PXE boot.

    Task 3. Creating a Customized Image of Windows 7

    While you install an operating system using WDS it is better to deploy a customized image of your OS. That will reduce the pain of installing the necessary softwares in each system after deployment.Here I am going to explain the steps to create a customized image of windows 7 using sysprep and imageX tool.

    For creating the customized image we need to have the below tools with us:


    >Windows AIK
    >Technician computer
    >Reference Computer (Which is installed with all the necessary softwares)

    1. Set up a Windows PE build environment

    • Install AIK on the technician computer
    • On the technician computer, click start, point to all programs,point to windows AIK, right-click Deployment Tools Command Prompt, and then select run as administrator.Then type the command as follows: copype.cmd x86 d:\winpe_x86
    • Copy the base image (Winpe.wim) to the \Winpe_x8r\ISO\sources folder and rename the file to Boot.wim. Type the command as follows:
      copy D:\winpe_x86\winpe.wim D:\winpe_x86\ISO\sources\boot.wim
    • Add imagex.exe to the winpe_x86\iso folder. Type the command as follows:
      copy "C:\Program Files\Windows AIK\Tools\x86\imagex.exe" D:\winpe_x
      86\iso\
    • Create an ISO Image of Install.wim File : oscdimg -n -bD:\winpe_x86\etfsboot.com D:\winpe_x86\ISO D:\winpe_x86\winpe_x86.iso
    • Burn the ISO image to a disc and label it as Windows PE boot image.

    2. Create the Image of the reference computer:

    • Now you have to go to the reference computer which is installed with all the necessary applications and run the sysprep. You can open up a command prompt and type the command as below:
      c:\windows\system32\sysprep\sysprep.exe /oobe /generalize /shutdown
    • After running the command the computer will shutdown automatically.
    • Now boot the reference computer from the Windows PE boot image disc that we have already created.
    • As as the computer boots you will get a command prompt. Move to the drive where the disc got mounted. Type the command as follows : imagex /capture C: C:\Install.wim“Win 7 x86 Proffessional” /VERIFY
    • Reboot the computer and check the C drive where you will find the Install.wim file.This is the image of your reference computer. Upload the Image to the WDS server and deploy.
    Troubleshooting

    I strongly recommend you  to check the logs by going to the Event Viewer before you begin troubleshooting.